Latest News — How-To's
How to Install Pavers Over Existing Concrete Patio 0
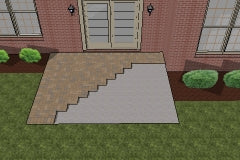 One of the simplest and easiest ideas to dress-up your existing concrete patio is to lay pavers over the top of it. Sounds too easy...right? It is really that easy, but there are a few items to consider before you get started. Click here if you want to learn how to install a larger paver patio over top of smaller existing concrete patio.
 First, your existing concrete patio has to be in good shape, i.e., no large cracks, a smooth surface with no signs of scaling or spalling. Secondly, make sure your existing patio slopes away from you home, meaning that when it rains, water runs away from your home. And lastly, the top of your existing concrete patio must be at least the thickness of your paver below your door's threshold.
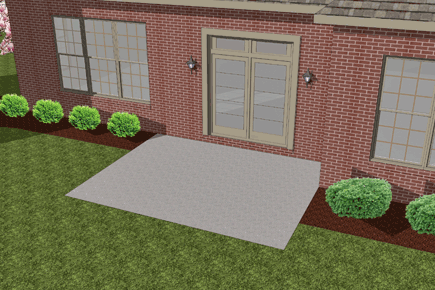 Step 1.
Clean your existing concrete patio from all dirt and debris. It may be necessary to grind any bumps or ridges flat with surface.
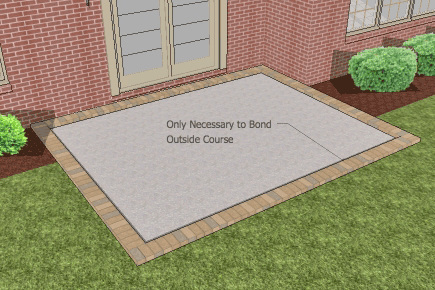 Step 2.
Your paver patio will be more aesthetically pleasing if you install a border course. The border course will be the only pavers necessary to bond to the existing concrete. Use a quality professional masonry adhesive for this application.
Start laying the border course along your home, butting the pavers against the building and bonding them generously to your existing concrete patio. Continue laying and bonding the border course of pavers along the perimeter of your patio.
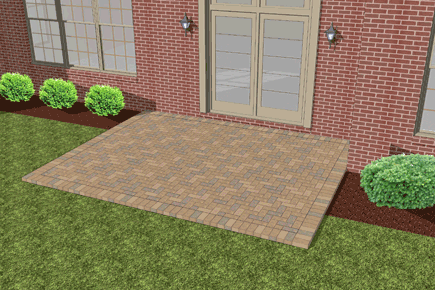 Step 3.
After the adhesive bonding the border course completely dries, you can begin laying the field pavers. Start the pattern in one corner and work your way across to the opposite corner. More than likely, you will need to cut pavers along the opposite sides.
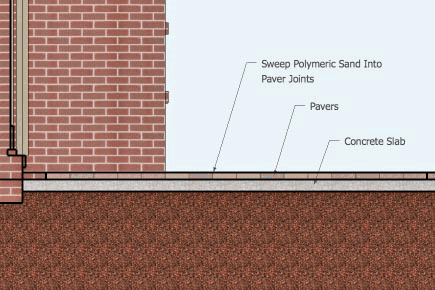
Once all your pavers are laid, you are ready spread sand into the paver joints. Note: The pavers will probably be wobbly prior to installing the joint sand. Sweep the sand across the pavers allowing it to fall into the paver joints.
We recommend using a professional grade polymeric sand for your joints. This will help bond the pavers laterally and keep weeds from germinating between the joints. Be sure to follow the manufacturer's instructions for the polymeric sand installation.
Step 4.
Enjoy your new patio!
- Steve Combs
- Tags: How-To's
How to Install a Paver Patio 0
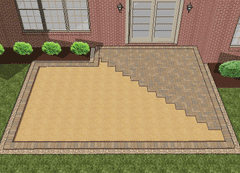
Is a paver patio one of those ideas you are considering to spruce up the rear yard? If so, not only do you need to know how to install a paver patio, but there are a few other items you need to know.
Pavers are available in a wide range of shapes, styles, sizes and color blends. Depending on the sizes you choose for your paver patio, there are large variety of patterns you can lay them in; herringbone pattern, running bond pattern, basket weave pattern, etc. View these and more paver patterns.
How much does a paver patio cost? If you contract a professional paver installer, you should plan on spending $15 - $20 per square foot, depending on paver type and where you live. This would include all materials and labor. If you are thinking of installing your paver patio yourself, you could expect to save approximately 50%.
Now that you have some basic information, let's learn how to install a paver patio.
Note: If you are have an existing concrete patio you may want to read our step-by-step instructions on "How to Install Pavers Over Your Existing Concrete Patio".
Step 1.
Create a design or plan and sketch it on a piece of paper. Or download one of our pre-designed paver patios that includes a material list and everything your need to plan your project.
Call your local utility protection service and have them mark any underground utilities where you will be digging.
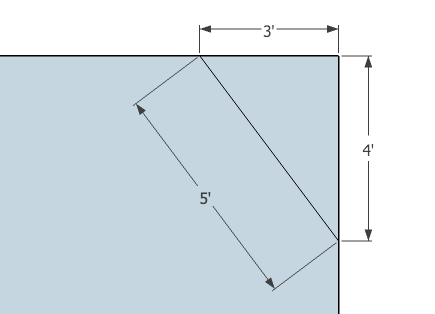
Next, layout your new design in area where you plan installing the paver patio. In order to square up the patio (make the sides 90 degrees to your home), you need to establish a reference line perpendicular to your home. This can be accomplished by using two stakes and a string.
Set one stake in one corner of the patio against your home and the second stake out, along one side of your patio, but 90 degress to your home. Set the string 90 degrees by using the 3-4-5 triangle method. Starting at one of the corners that meets your home, measure 3' along your home and then from the same corner, measure 4' up one side of where your patio will be installed. The diagonal point joining these two points should be 5'. If not, adjust the 4' side until the diagonal measurement is exactly 5'.
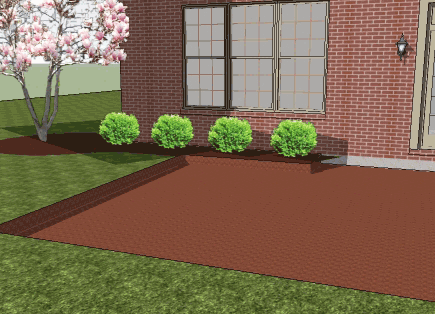
Using the string and your home, you can begin laying out your patio with a measuring tape and marking paint.
 Step 2.
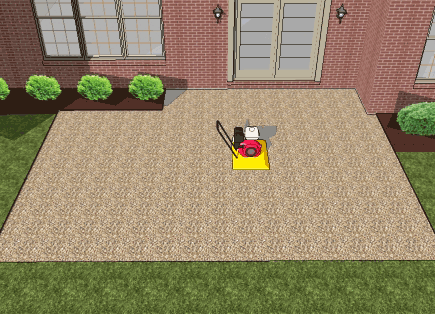
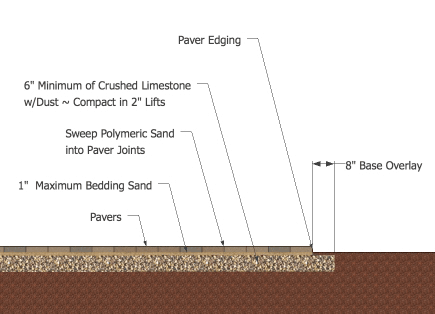
How to excavate for paver patio. Determine vertically where the top surface of your paver patio will be in relation to your home. From this point you will excavate down approximately 9 1/2". This will allow for 6" of a compacted gravel base plus 1" bedding sand plus 2 3/8" of paver. Make sure to excavate so the patio will slope away from your home.
Additionally, excavate 8-10" outside the layout marking lines to allow for grave base overlay. Once all loose soil is removed, compact the excavated area with a vibratory plate compactor.
 Step 3.
Installing the gravel base for paver patio. Begin the gravel installation by evenly spreading a crushed limestone with dust aggregate over the excavated area and compacting with vibratory plate compactor every 2". The compacted gravel is the heart and soul of your paver patio, so make sure you compact it thoroughly.
Continue adding paver base gravel until you have reached a 6" depth and are approximately 3 1/2" of finished paver height. Again you need to verify your gravel base slopes away from your home. Make sure the gravel surface is relatively flat, but sloping, by laying a straight 2 x 4 over the base, adding or raking gravel to achieve satisfying results.
 Step 4.
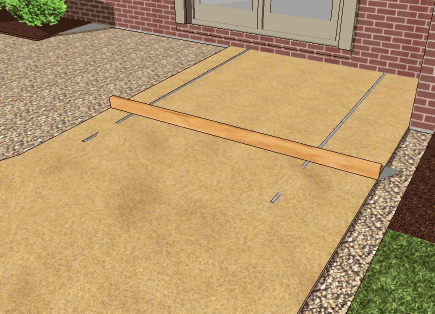
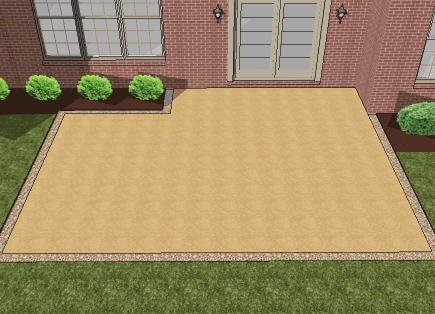
Installing bedding sand for paver patio. Next, you want to evenly spread a course sand over the paver base gravel, creating a sand bed for the pavers to seat in. This can effectively and efficiently be achieved by laying two 1" diameter pipe approximately 10' long directly onto the gravel base as shown. We recommend using 1" galvanized electrical conduit pipe for it's inexpensive cost.
Start spreading the course sand, as even as possible, between the pipe and a couple of feet on each side. With a 2 x 4 approximately 8' long, start screeding the sand. More than likely you will have to fill in areas and re-screed to achieve a flat, uniform layer of bedding sand.
Once you complete one area, remove the pipe and fill in with troughs created from the pipe. These area can be smoothed using a bull float. Move the pipe to a new location and begin the process again until the entire pavered area has a uniform and flat layer of bedding sand.
 Step 5.
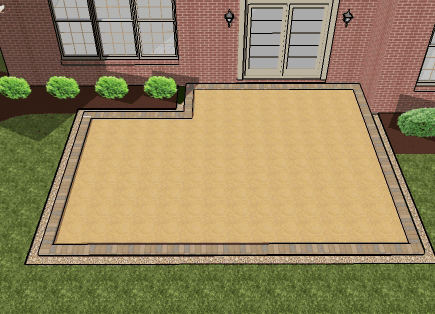
Installing a border around paver patio. In order to achieve professional looking results, it is essential to install a paver border, whether it is the same blend as your field pavers or not.
Before you start laying the border course, it will be necessary to re-layout your patio with marking paint. Beginning in a corner closest to your home, lay the pavers along your home and out along the layout string you set earlier and following your layout marking until the entire border is laid.
 Step 6.
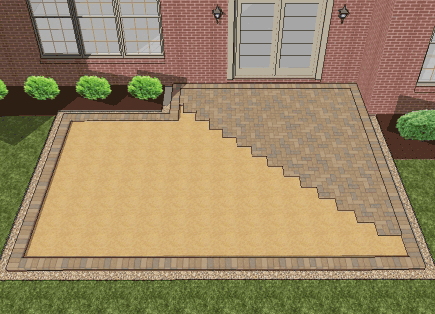
Installing the field pavers. Start laying the paver pattern in one corner and work your way across to the opposite corner. In most cases, the paver along the opposite sides will need cut or trimmed to fit your design.
 Step 7.
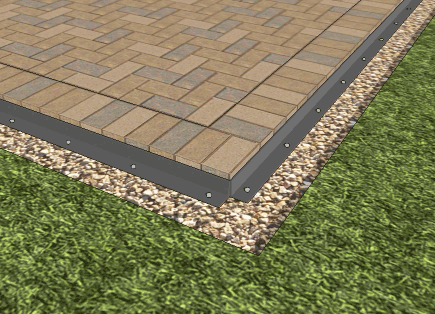
Installing the joint sand to paver patio. After you have laid all the field pavers, it is time to install the paver restraint. This is a pretty simple installation and is self explanatory. Just lay the edging up tight against the pavers, down on the gravel and begin installing the 12" spikes into ALL the spike holes in the paver edging.
 Step 8.
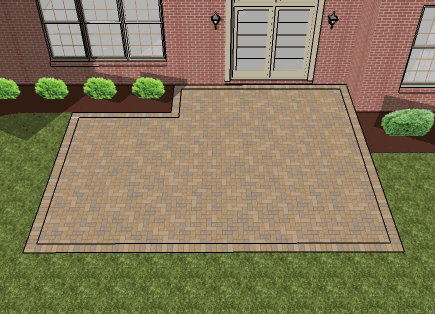
Installing the joint sand to paver joints. As with all the above steps, how you install the joint sand is very important. Choose either a fine sand or a polymeric sand manufactured for pavers. We recommend a professional grade polymeric sand to keep weeds from germinating in the joints.
Start by spreading the sand over the entire paver patio and sweeping it into all the paver joints. With access still on the pavers, begin running the plate compactor all over the top of the pavers. This will vibrate sand into the joints, but more importantly seat the pavers into the bedding sand. Once finished sweep off the excess sand. If you are using polymeric sand, follow the manufacturers instructions.
 Step 9.
Enjoy your new paver patio!
- Steve Combs
- Tags: How-To's
How to Install Larger Paver Patio Over Smaller Existing Concrete Patio 0

If you currently have a concrete patio, but want a larger paver patio that provides more space and opportunity to incorporate some of your favorite ideas to enhance your outdoor living, we can help.
To be efficient and cost effective, we want to lay your new pavers over top of your existing patio and extend them to match your new design, but first you will want to verify that your existing concrete patio is sufficient for this application. Your existing patio MUST; be smooth, contain no large cracks, no evidence of scaling or spalling, must slope away from your home and must be at least the thickness of your paver below your entrance threshold.
If your existing concrete patio meets all of this criteria, you are ready to roll.
 Step 1.
Clean concrete patio. Clean your existing concrete patio from all dirt and debris. It may be necessary to grind any bumps or ridges flat with surface.
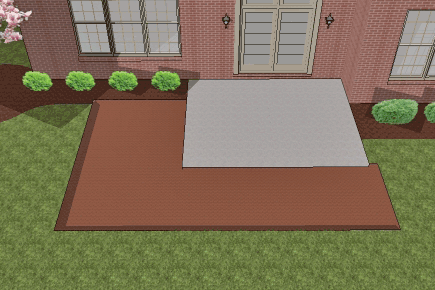 Step 2.
How to excavate for paver patio. Lay out the new design of your paver patio using marking paint. Begin excavating the soil to a depth of approximately 7' below the existing concrete patio. This will allow for 6" of a compacted gravel base plus 1" bedding sand. Excavate 8-10" outside the layout marking lines to allow for grave base overlay (see section view at bottom of page).
 Step 3.
Installing the gravel base for paver patio. After excavation is completed and all the loose soil is removed, begin installing the crushed limestone with dust gravel base(from dust to 1 1/4" crushed limestone). Spread the gravel evenly throughout the excavated area, compacting the it in 2" lifts with a vibratory plate compactor. Continue adding gravel and compacting the gravel base until it reaches 3/4" of the top of the existing concrete patio.
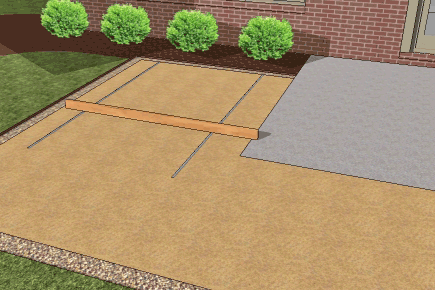 Step 4.
Installing bedding sand for paver patio. Using 1" diameter pipe approximately 10' long, lay the pipe directly onto the gravel base as show in the diagram to the left. We recommend using 1" galvanized electric conduit pipe because of it's expensive cost. Begin spreading enough coarse sand to cover the pipe, in between the pipe and a couple of feet on each side of each pipe.
With an 8' long 2 x 4, begin screeding the sand. It may be necessary to fill in any voids with additional sand and re-screed to achieve a uniform layer of bedding sand.
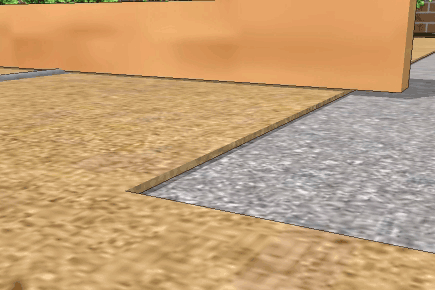
Note:
It is necessary to install the bedding sand approximately 3/16" above the concrete. This will allow the pavers installed over the gravel base to seat down into the bedding sand when compacted later on in the installation.
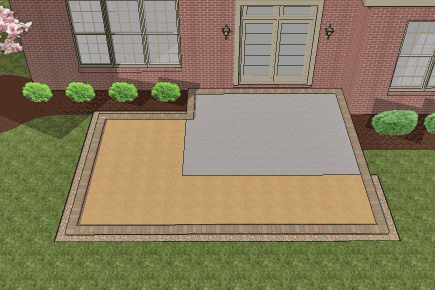 Step 6.
Installing a border around paver patio. Your paver patio will be more aesthetically pleasing if you install a border course. The border course that follows the concrete perimeter of your new design are the only pavers necessary to bond to the existing concrete. Use a quality professional masonry adhesive for this application.
Start laying the border course along your home, butting the pavers against the building and bonding them generously to your existing concrete patio. Continue laying the border course of pavers along the perimeter of your patio.
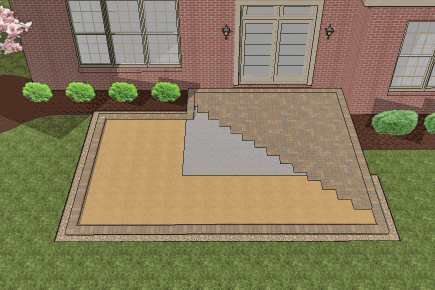 Step 7.
Installing the field pavers. After the adhesive bonding the border course completely dries, you can begin laying the field pavers. Start the pattern in one corner and work your way across to the opposite corner. More than likely, you will need to cut pavers along the opposite sides.
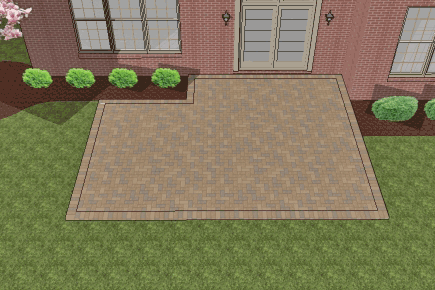 Step 8.
Installing the joint sand to paver patio. Once all your pavers are laid, you are ready spread sand into the paver joints. Note: The pavers will probably be wobbly over the existing concrete patio prior to installing the joint sand. Sweep the sand across the pavers allowing it to fall into the paver joints. With additional sand still on the pavers begin running the vibratory plate over the pavers. This will help vibrate sand into the joints and seat the pavers laid over the gravel base seat into the bedding sand. Once the joints are filled with sand and pavers are properly seated, sweep the additional sand from the paver patio.
Note: We recommend using a professional grade polymeric sand for your joints. This will help bond the pavers laterally and keep weeds from germinating between the joints. Be sure to follow the manufacturer's instructions for the polymeric sand installation.

Step 9.
Enjoy your new patio!
- Steve Combs
- Tags: How-To's
How to Design a Paver Patio. 0
Designing a custom paver patio may seem a little challenging and a bit overwhelming, but if you follow some basic steps, you will be able to incorporate your patio ideas into a design that not only compliments your outdoor living style, but also one that fits very well with your pocket book. Sounds pretty good, huh?
At MyPatioDesign.com, we believe there are 3 factors that completely affect whether a design is a success or not; budget, functionality and aesthetics. It doesn’t matter who is doing the design...you, us or another contractor, these 3 factors, if you want success, need defined.
Patio Budget. A patio budget is more than likely the most important factor of your design project and is probably the hardest for a homeowner to define. A budget brings an outdoor living project into perspective, it gives the designer a point of reference and it helps eliminate any surprises.
In order to create a budget you need to know how much a paver patio cost as well as any other enhancing ideas or accessories you may want to include, such as seating walls, an outdoor fireplace or even a grill station.

Speaking in general and there are some exceptions, a professionally installed paver patio is going to cost somewhere between $15 to $18 per square foot depending on where you live and the paver material you choose. So if you were thinking of having a 20’ x 20’ or 400 sq. ft. paver patio installed, you should plan on spending approximately $6,000 - $7,200 for the patio alone.
Hardscape accessories, i.e. seating walls, fireplaces, etc., are going to have larger variation in prices, but our list will be again, in general and professionally installed.
- A seating wall will cost somewhere in the neighborhood of $55-$65 per linear foot and includes a column every 18’ or so.
- A block grill station will cost approximately $900-$1,200, but there are a lot of options that could raise the price significantly.
- You might plan to spend around $500-$600 for the cost of a simple wood burning, built-in, block fire pit.
- Of all the hardscape accessories, the cost for an outdoor fireplace will vary the most, ranging from $5,500 to over $12,000, mainly due to all the different types of material.
If you plan on installing these yourself, plan on a savings of 30-35%. Material is a larger part in most of these types of projects.
 Functionality. How will I use my patio? In other words, what kind of ideas can I incorporate into my design that will match or enhance my outdoor living style and habits. For example, I love to grill and entertain. So a grill station with an attached outdoor bar would be very functional to me. If you entertain much, a seating wall is a perfect idea for overflow seating and will rid of unnecessary furniture. Fire pits are great for warming up to and roasting marsh mellows during cooler evenings. A pergola is another idea that will not only provide an aesthetic impact, but is also very functional and will help you escape the hot sun during the summer months. Another item that is often under estimated, is the size of patio table that will function to your needs. Choose one that fits your family size or your future family size.
Knowing what ideas you plan to design into your patio will determine the size of your patio. Don’t be stingy with space, it always looks larger on paper, but on the other hand bigger doesn’t equate to more functional. Place your hardscape accessories or ideas in an order that is most functional to you. For me, my grill station is closest to my home entrance for easy access, then my patio table and my fire pit is furthest, being the item I use the least.

Aesthetics. What do I want my patio to look like? This is the fun one and the one that you will probably spend the most time on. A good design will integrate your ideas or accessories into pleasing geometry that compliments the architecture of your home. Just as a side note, brick pavers or concrete pavers are going to give you the most design flexibility.
Generally speaking, radial designs will soften corners and I use a lot of curves in my designs, but I always try to have some straight edges to place grills, fireplaces and straight lined accessories. Curves will better allow you to accentuate certain focal point plants and structures, such as a fountain or a nice Japanese Maple tree.
On the other hand, square and rectangle patio designs will help you highlight dimensional features of your home and are easier to incorporate some of those straight lined accessories we mentioned above into your design. For example, a home with a large bay window or entrance may be complimented by laying an area of your patio on a 45 degree angle. Unless your home has some really unique architecture, I wouldn’t get to caught up in trying to match or compliment geometry. In most cases radial or square designs are simply a factor of preference.
There are a few other patio ideas that will help you create some interest in your design. Using a border paver that contrast with the field pavers will not only help you define the outside geometry of your design, but can also define space on your patio. Circular paver patterns and contrasting paver insets will also add a lot of creativity to your patio design.

And the last item to consider, in regards to aesthetics, is color blends. A couple rule of thumbs to follow. If your brick is busy, don’t use a busy paver blend. Concentrate on a more solid color, pulling one of the colors out of your brick. And visa versa, if your brick has a more solid tone, then busy paver blends are ok. With lighter color siding, I always try to contrast, with either a darker border or darker field paver and a more complimenting blend for the vertical accessories, such as seating walls, fireplaces, grill stations, etc.
The more time you invest up front and into your design, the easier and more enjoyable the installation will be. Spending a few hundred dollars on a formal design may end up saving you thousands of dollars and aggravation compared to a design that is drawn on a napkin. Feel free to browse our large library of downloadable patio plans to come with your own ideas.
Remember, do your homework and enjoy your patio!
- Steve Combs
- Tags: How-To's

 Step 1.
 Step 2.
 Step 3.
 Step 2.
 Step 3.
 Step 4.
 Step 5.
 Step 6.
 Step 7.
 Step 8.
 Step 9.
 Step 1.
 Step 2.
 Step 3.
 Step 4.
 Step 6.
 Step 7.
 Step 8.